IMPORTANT: No longer maintained
JetS3t is no longer maintained here. Please see the fork by Paul Gregoire (aka Mondain) at https://github.com/mondain/jets3t
JetS3t Cockpit
Cockpit is a graphical Java application for viewing and managing the contents of an Amazon S3 or Google Storage* account, and for managing Amazon CloudFront distributions.

Documentation
Read the Cockpit Users' Manual to learn how to use Cockpit.
Cockpit Online
To run Cockpit as a Java Applet in your web browser, without downloading or installing any software, visit the Cockpit Online page:
Cockpit Online
Version 0.9.1, approximate download size 3 MB
Sun's JRE plugin version 6 or later is required, and you will have to accept the certificate used to sign the applet.
Feature Summary
Cockpit offers the following capabilities:
Items with a red star (*) are new or updated since JetS3t version 0.8.0
- Manage buckets and objects in your account
- Specify where your buckets will be located (S3 only)
- Upload and download files
- Copy or move objects within and between buckets
- Rename one or more objects
- Update the metadata associated with objects
- Manage Access Control List (ACL) permissions for buckets and objects
- Choose default ACL permissions for uploaded files, to make them publicly readable or writable
- Automatically compress (gzip) and/or encrypt uploaded files. The encryption algorithm is configurable in Cockpit's preferences.
- Your upload preferences can now be saved for future use
- Uses sophisticated file comparison techniques to determine whether files have changed prior to uploading or downloading them, preventing unnecessary or accidental transfers
- Easily generate signed GET URLs for multiple objects to make them publicly available to others for a limited time. If your bucket is available via a virutal host name, create a URL that references this domain. (S3 only)
- Manage buckets owned by others (third-party buckets)
- Store your login credentials in password-protected files on your computer, online, or in any available folder
- Easily log in to Amazon DevPay S3 accounts (S3 only)
- Easily manage Bucket logging settings (S3 only)
- Filter which objects are listed, to find exactly what you are interested in
- Advanced configuration options
- When uploading files, specific file/directory paths can be ignored using .jets3t-ignore settings files
- Configure your bucket to be Requester Pays (S3 only)
- Switch logins menu item allows you to switch quickly between multiple accounts
- Configure CloudFront Distributions to distribute your files
Cockpit Users' Manual
Running Cockpit
Cockpit may be run as a stand-alone application or as a browser applet.
To run the online browser applet visit Cockpit Online.
To obtain the stand-alone version download the JetS3t distribution and unzip the archive on your machine. Cockpit can then be run using the included cockpit start scripts.
Log in
When Cockpit starts, or when you select the Service -> Log in... menu item, the login dialog will be displayed. This dialog allows you to log in to the Amazon S3 or Google Storage service, and to manage your login credentials by storing them in password-protected files on your own machine or in your online storage account.
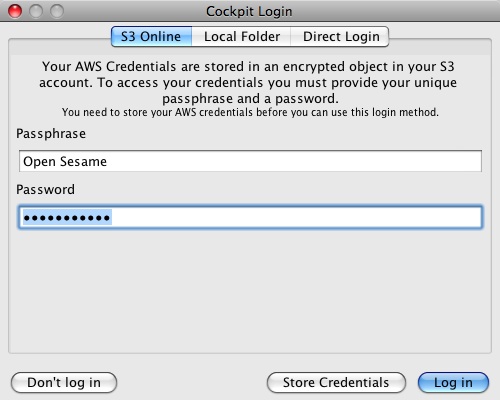
The login dialog offers a choice of three ways to provide your credentials:
- Online: Your credentials are stored online in your Amazon S3 or Google Storage account and can only be accessed with the correct Passphrase and Password.
The credentials are stored in a private bucket whose name is based on a hash of your passphrase. The credentials file itself is publicly readable but the object's name cannot be guessed as it is based on a hash of your password, as well as being encrypted with this password. - Local Folder: Your credentials are stored in a folder of your choice on your computer, or on any disk available to your computer (such as a USB thumb drive).
- Direct Login: Simply provide your access and secret keys. Your credentials are not stored anywhere.
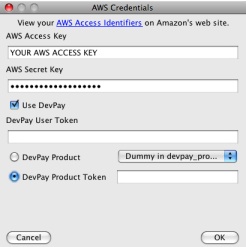
To store your credentials and make them easily available in the future choose the Online or Local Folder option, enter a password, and click the Store Credentials button. You will be prompted for your credentials, which will be saved to a local file or to your online account, depending on which option you selected.
Switch Logins
If you have more than one account, you can use Cockpit's Service -> Switch login menu item to switch quickly between each of your accounts.
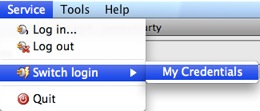
When you log in to a service account, that account's description or access key is added to this menu. If you log out of an account by using the Service -> Log out menu item, that account will also be removed from the list of "switchable" accounts.
Manage your buckets
Once you have logged in you can manage your buckets. Upon log in all your buckets will automatically be displayed in Cockpit's left pane under the heading Buckets. If your buckets list is empty, it's about time you created a bucket!
To create a bucket, click the bucket action button (it has a gear icon and is on the top-right of the buckets pane) and choose the menu item Create new bucket.... You will be prompted to name your bucket. Notice that the default new bucket name includes your service ID string. It is a good idea to leave this string as a prefix for your bucket names to ensure your names are unique in the system.
When you select a bucket name in the left pane Cockpit will list the objects stored in that bucket. This list will be displayed in the right-hand pane under the heading Objects.
Bucket Menu
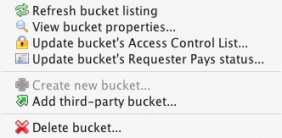
The Buckets menu shows the operations you can perform on your buckets.
For convenience this menu can also be displayed as a context menu if you right-click a bucket name.
- Refresh bucket listing: When Cockpit first logs in it caches the list of bucekts at that time. Use this menu item to refresh your bucket listing manually, to be sure the listing is up-to-date.
- View bucket properties...: Displays the bucket's properties such as its creation date.
- Update bucket's Access Control List...: View and change the access permissions of the selected bucket (see Access Control Lists)
- Update bucket's Requester Pays status...: View and change the Requester Pays status of the selected bucket, which may be enabled or disabled (see Configure a Bucket to be Requester Pays)
- Create new bucket...: Creates a new bucket
- Add third-party bucket...: A third-party bucket is one owned by someone else but which is publicly accessible, or accessible to you. You can manually add third-party buckets to your listing with this menu item, and once you have done so you can perform whatever operations you like provided you have the necessary permissions. For example, the jets3t bucket containing Cockpit Online is publicly readable, so you can add this to your bucket listing. However you won't be allowed to do anything but look, sorry...
- Delete bucket...: Deletes the bucket after prompting for confirmation. Note that you can only delete empty buckets - if you try to delete a bucket containing some objects you will get an error message.
Bucket Location
When you create a bucket, Cockpit allows you to specify the bucket's name and the Amazon data centre location where the bucket will be created. A bucket may be located in the US Standard location (the default) or elsewhere. Bucket's in locations other than US Standard may incur additional storage and access fees.
To create a bucket in a location other than US Standard, the bucket's name must be a valid component of a DNS host name. Names which will not be valid as part of a host name cannot be used for non-US buckets, or for buckets that will be accessible via S3's virtual hosting feature. The Create Bucket dialog box provides feedback on whether or not the bucket name you have chosen is a valid DNS host name component.
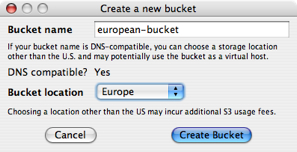
As a general rule, DNS-compatible bucket names must be longer than 3 characters and must contain only lower-case letters, hyphens or full-stops.
Bucket Logging
Cockpit includes support for the (beta) Server Access Logging capabilities of S3. Server Access Logging allows you to specific that some or all of your buckets will have their activity logged by Amazon. Amazon then delivers log files summarising the activity on your logged buckets to a bucket of your choice.
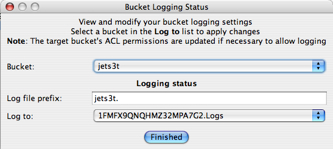
To activate logging for a bucket, start the Bucket Logging Status dialog via the menu Tools -> Configure Bucket logging.... In this dialog you simply choose a bucket to be logged from the Bucket list, set a log file prefix (text added as a prefix to the generated log files), and select a bucket to log to from the Log to list. Any changes you make in this dialog are applied when the Log to bucket is changed or selected.
The Bucket Logging Status dialog also shows the status of bucket logging for the selected Bucket. In other words, selecting a bucket from the Bucket list will cause Cockpit to query S3 for that bucket's logging status, which will then be displayed. Once the current status is displayed, you can change it or leave it as it is.
Be aware that the Log to bucket used for Server Access Logging must have special ACL permissions to allow the Amazon logging service to write log files to it. The ACL settings required are that the Amazon Logging group (http://acs.amazonaws.com/groups/s3/Delivery) have both READ_ACP and WRITE permission. Cockpit automatically makes the necessary ACL changes when you choose a Log to bucket in the Bucket Logging Status dialog, but if you wish to remove these settings later on you will have to do this yourself using the standard Bucket ACL Permissions dialog.
Manage your objects
When you log in to a service and select a bucket, the objects contained in that bucket are listed in the right-hand pane under the heading Objects. You can upload files to a service by dragging-and-dropping them on the objects pane, or by using the Object Menu as described below.
Object Menu
The Objects menu shows the operations you can perform on your objects.
For convenience this menu can also be displayed as a context menu if you right-click an object in the list.
- Refresh object listing: When Cockpit lists the contents of a bucket it caches the list of objects to avoid having to look them up again. Use this menu item to refresh your object listing manually, to be sure it is up-to-date.
- View or Modify object attributes...: Displays objects' properties, such as their size, content type, and their metadata information. You can modify the metadata information associated with objects.
- Copy or Move objects...: Displays a dialog that allows you to copy, move or rename objects within or between your buckets.
- View or Modify Access Control Lists...: View and change the access permissions of the selected object(s) (see Access Control Lists)
- Download objects...: This menu item will prompt for a target directory, then download all the selected objects into that directory. If the objects being downloaded were stored in a directory structure (eg if you uploaded a directory containing other directories and files) that directory structure will be re-created in the target location.
- Upload files...: This menu item will prompt you to choose some files and/or folders to upload.
- Generate Public GET URLs...: Generates a time-limited GET URL string that will allow anyone with the URL to access an object for a limited amount of time. This operation will prompt you for the number of hours until the URL will expire (the number can be a fraction, eg 0.5 for 30 minutes) and will generate the appropriate signed URL. See Time-limited URLs.
- Generate Torrent URL...: Generates a URL that points to a BitTorrent file, allowing the object to be downloaded with a BitTorrent client application.
- Delete objects...: Deletes the currently selected object or objects, after prompting for confirmation.
Object Filtering
Cockpit allows you to apply filtering to determine which objects are listed in the objects pane. This filtering provides a convenient way to reduce the number of objects displayed by Cockpit, and as the filtering is applied when listing objects it can also greatly reduce the time required to list the relevant contents of buckets with many objects.
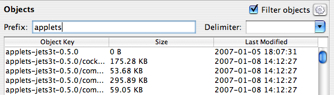
Filtering is turned on by selecting the Filter objects check box. By default no filtering is applied as the Prefix and Delimiter filtering options are blank. Filtering is applied by entering a prefix or a delimiter or both:
- Prefix: Only objects with keys that start with the prefix will be listed. The prefix can be anything from a partial string or single character, up to the entire name of an object.
If object keys are divided into logical "directories" in your account using forward-slashes (/), or indeed any character, only the contents of a "directory" can be displayed by using the directory name and the slash (eg "Documents/"). - Delimiter: Only objects with keys that match the prefix (if it set) and that end with the delimiter will be displayed. The delimiter is most useful when your object keys are divided into logical "directories" separated by a character, such as a forward-slash (/). In this case, specifying "/" as the delimiter will limit the object listing to only top-level items or directories.
Filtering can be applied before objects are listed, such as by specifying a filter before clicking on a bucket for the first time- this is particularly useful for buckets with many objects. Alternately, filtering can be applied on a current listing by changing the prefix and/or delimiter and pressing return to trigger a refresh of the objects.
The exact behaviour of the filtering mechanism can be a little hard to understand, so play around with it to get a feel for how it works. There is also some documentation available in the Amazon Resource Center's S3 Developer Guide, in the section on Listing Keys Hierarchically.
Upload files
You upload files by selecting a target bucket, then either dragging-and-dropping files onto the Objects listing or selecting the Object Menu item Upload file(s).... Before uploading, Cockpit examines the files (this may take some time for large files) and uploads them provided there are no clashes (see Automatic File Comparisons).
Cockpit displays a progress dialog during uploads showing how much of the total data has been uploaded. Uploads can be cancelled at any time.
If a folder is uploaded Cockpit will upload the folder and all its contents, storing enough information to re-create the folder structure exactly when it is downloaded. It does this by creating an empty object for each folder or sub-folder, and tagging the object with the content type application/x-directory.
Upload Preferences
Cockpit can be instructed to perform additional tasks when it uploads files by setting Upload options in the Cockpit Preferences dialog box available from the menu item Tools -> Preferences....
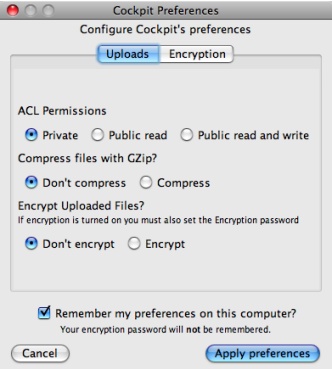
The Upload preferences allow you to set:
- Storage Class (S3 only): The storage class to use for new objects. The REDUCED_REDUNDANCY class costs less in storage fees, but provides less redundancy in exchange. The reduced redundancy class is ideal for content that can be re-generated or is also stored somewhere other than S3.
- ACL Permissions: The Access Control List permissions to apply to uploaded objects.
- Compression: Whether to compress (gzip) files before uploading them.
Compressing files may save space in your account and reduce the time taken for uploads provided the files compress well, however note that some files such as movies and music do not generally compress well. - Encryption: Whether to encrypt files before uploading them. If encryption is turned on you must also set a password in the Encryption preferences section.
Encrypting files may help to protect sensitive information, especially if you don't fully trust the operators of your online storage service. The encryption relies on a password you provide, and files will only be readable by someone with that password.
Note: Beware of using more than one password in a bucket, as Cockpit is only smart enough to handle one password at a time when downloading.
Warning: The default encryption algorithm Cockpit uses is not industrial-strength, rather it is a low-strength algorithm that has the advantage of being readily available in all versions of Java: PBEWithMD5AndDES. You can, and should, choose to use a much stronger algorithm such as PBEWithSHA256and256bitAES-CBC-BC, however your choice of encryption algorithms may vary depending on how Java is configured on your computer.
As of version 0.7.0, Cockpit can remember your preferences for the next time you run the application. All the upload preferences will be remembered except for the encryption password: for security reasons, you must re-enter the encryption password each time you run the application.
Download files
Cockpit does not allow files to be downloaded using drag-and-drop - unfortunately the Java Swing library makes this infeasible. To download objects you must select the objects you want, then choose the Object Menu item Download object(s).
Before downloading objects, Cockpit compares any files present in the target location against the objects online and detects any clashes (see Automatic File Comparisons). If you download objects contained in a folder structure, that folder structure will be re-created exactly on your computer (provided the files were initially uploaded with a JetS3t tool).
Cockpit will automatically unzip GZipped objects and decrypt Encrypted objects, though you will have to set your encryption password in the Cockpit Preferences dialog before you can download encrypted objects.
View or Modify Object Attributes
When you select the View or Modify Object Attributes... menu item for one or more objects, Cockpit displays the Object Attributes dialog.
This dialog displays the attributes for each of the objects you selected, and you can step through multiple objects using the left and right arrow buttons. Each object has two kinds of attributes: standard attributes such as Size and Last Modified Date that you cannot change, and Metadata attributes such as Content-Type that you can change.
In this dialog, you can add and remove the metadata items associated with an object using the green plus and minus buttons, and you can change the name or value of a metadata item by double-clicking an entry in the Metadata Attributes table. Note that metadata item names can contain only standard English (ASCII) characters and cannot contain spaces.
Online services support a subset of HTTP header metadata values, such as Content-Type and Content-Disposition. When you create a metadata item with a HTTP header name that a service recognizes, Cockpit will store the metadata using exactly this name. This means that you can easily set and change the content type value associated with an object, and these HTTP header values will be returned to web browsers that access your objects.
If you create a metadata item with a name that a service will not recognize, such as "my-metadata-name", cockpit will automatically alter the metadata name behind the scenes to include the prefix x-amz-meta- prefix, allowing the metadata information to be stored even though it is not a recognized HTTP header.
Copy, Move or Rename Objects
When you select the Copy or Move objects... menu item for one or more objects, Cockpit displays the Copy or Move Objects dialog.
This dialog allows you to do many things with the objects already stored in your account.
To copy objects from one bucket to another, select the name of the destination bucket in the Copy to Bucket field. To move objects to another bucket, first select the destination bucket then select the Move Objects checkbox. The only difference between copying and moving objects is that when you select the move option, Cockpit will automatically delete the original object after it has been successfully copied.
As a convenience, Cockpit allows you to specify the access permissions and storage class that will apply to the newly copied or moved objects. If you leave the access permissions Unchanged the new objects will have the same access control settings as the original objects, or you can choose to make the new objects Private or Publicly Accessible. If you are willing to accept reduced redundancy for the object copies in exchange for lower storage fees, you can select the REDUCED_REDUNDANCY storage class instead of the default STANDARD storage class.
The Copy or Move Objects dialog also allows you to change the name of your objects when they are copied or moved. By default, the names of the objects you copy or move will be left unchanged. However, if you select the Rename objects with pattern option you can specify a renaming pattern that will apply to each object.
Renaming patterns can contain any text values, so you can easily rename a single object by simply typing in its new name directly. However, things get more difficult when you are working with multiple objects at once, because each destination object must have a unique name. To help you rename multiple objects at a time, Cockpit supports a number of pattern variables that you can use to construct your destination object names. As you build your renaming pattern, Cockpit displays a preview of the object names that your pattern will produce, so you can make sure it is doing what you want.
Here are the pattern variables you can use when renaming objects:
- {key} The full key/name of the original objects. This variable is useful if you want to add a "subdirectory" prefix to your objects, in which case you could apply the pattern new/subdir/prefix/{key}
- {path} The "subdirectory" path of the original objects, for example an object named "this/is/my/object.txt" will have a path value of "this/is/my/".
- {filename} The filename portion of the original objects' names, for example an object named "this/is/my/object.txt" will have a filename value of "object.txt". This variable is useful if you need to move objects stored in one "subdirectory" to another one, in which case you could apply the pattern new/subdir/{filename}.
- {basename} The portion of the objects' filename prior to the extension, for example an object named "this/is/my/object.txt" will have a basename value of "object". This variable is useful if you need to change the filename extensions for a number of objects, in which case you could apply the pattern {basename}.newext. If the original objects included a "subdirectory" portion in their names, you can retain this path informaiton by including the {path} variable like so: {path}{basename}.newext.
- {ext} The extension portion of the objects' filenames, for example an object named "this/is/my/object.txt" will have an ext value of "txt".
- {count} This variable assigns a unique integer value to every object in alphabetical order, starting from 1. This variable is not likely to be useful very often, but it may help if you need to move multiple objects with the same name into a single "subdirectory".
Access Control Lists
Amazon S3 and Google Storage uses Access Control List (ACL) settings to control who may access or modify items stored in your account. By default, buckets and objects are accessible only to the account owner - they are completely private.
Cockpit allows you to change the ACL settings for a bucket, or for one or more objects, by selecting the Update Access Control List menu item in the bucket or object menus. ACL settings are managed in the Update Access Control List dialog.
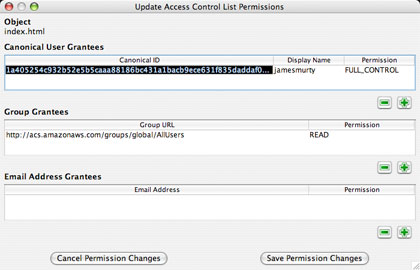
The default ACL setting is for the object's creator, represented by a Canonical ID, to have Full control.
The most common ACL change is to allow public access to a bucket or object. An object is made publicly accessible by granting READ access to members of the All Users group. To do this:
- Click the plus (+) button underneath the Group Grantees table, to add a new Group permission
- Make sure the Group URI is set to http://acs.amazonaws.com/groups/global/AllUsers by double-clicking the URI and selecting it
- Set the Permission option to READ if necessary by double-clicking it
- Save the changes using the Save Permission Changes button
Note that you can also used signed GET URLs to make an object publicly available for a limited time.
Although all ACL combinations supported by Amazon S3 can be managed using this dialog box, this is a complex topic and we won't deal with it here. Please refer to Amazon's technical documentation for more information about the use of Access Control Lists.
Automatic File Comparisons
Cockpit automatically compares files that are being uploaded or downloaded with files in the destination to detect clashes. When a file with the same name exists on the target, Cockpit determines whether the file has changed, and if so which version of the file is the most recent.
Each file is given one of the following status types:
- New File: The file does not exist in the destination
- Unchanged: The file is identical to the copy in the destination
- Changed: The file has been changed
If there are Unchanged or Changed files, the Replace file(s) dialog is displayed.
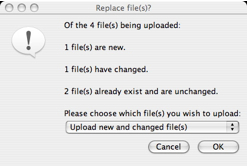
This dialog allows you to choose which clashing files in the destination should be replaced, if any. The options available may include the following:
- Only upload/download new file(s): Only files that do not already exist in the destination will be uploaded or downloaded. No existing file will be over-written.
- Upload/download new and changed file(s): New files and changed files will be transferred, but files that are unchanged will not be transferred. Only out-dated files will be over-written.
- Upload/Download all files: All the files will be uploaded or downloaded, regardless of what files are in the destination. Any existing files will be over-written.
File comparisons are performed using MD5 hashes of the file contents.
Signed GET URLs (S3 only)
Private objects stored in S3 can be made publicy available for a limited time using signed GET URLs. These signed URLs can be used by anyone to download the object in their web browser, up until a chosen time after which the URL will no longer work.
You create these time-limited URLs by selecting one or more objects and selecting the Object Menu item Generate Public GET URLs.... A dialog is displayed with a signed URL for each of the objects you selected. These URLs will be valid for 1 hour by default.
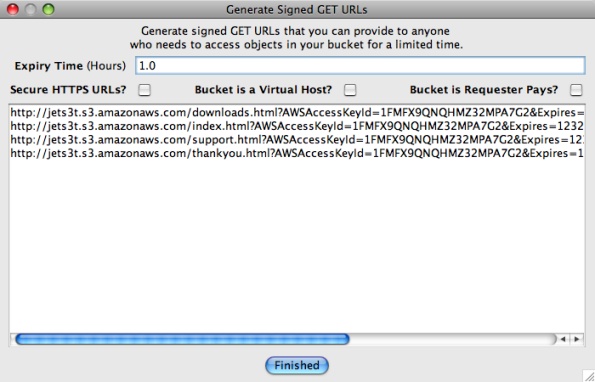
The dialog box includes a number of options you can adjust to control the properties of the generated URLs:
- Expiry Time: adjusts the number of hours until the URLs will expire. This number can be a fraction, for example the value 0.5 will create URLs valid for half an hour.
- Secure HTTPS URLs?: Choose whether the generated URLs should use the secure HTTPS protocol, or the insecure but faster HTTP protocol.
- Bucket is a Virtual Host?: Select this option if the bucket containing your objects is a virtual host endpoint of a DNS CNAME entry. If you don't know what this means, you won't need this option.
- Bucket is Requester Pays?: Select this option if the bucket containing your objects has the Requester Pays option enabled, in which case the generated URLs will contain an extra flag to indicate that you are willing to bear any request and bandwidth costs incurred by the use of the URLs.
The dialog will re-generate the signed URLs automatically as you adjust the options. To use the URLs, simply copy them from the text area to the clipboard and send the URLs to the person(s) who need to download the objects.
Advanced Configuration
Users can configure Cockpit using the advanced configuration files described in the Configuration section.
When Cockpit starts it looks for configuration files in the directory <UserHome>/.jets3t. If this directory exists and contains files called jets3t.properties and/or mime.types it will load the properties from these files, adding to or replacing any default configurations.
Files in the user's home directory will be read whether Cockpit is run in stand-alone more, or as an applet. This configuration option is most useful for those users who run Cockpit as an online applet, but wish to have more control over their own settings.
CloudFront Distributions (S3 only)
Amazon CloudFront is a content delivery service that works with Amazon Simple Storage Service (S3). With CloudFront, you can create "Distributions" that make publicly accessible objects in your S3 buckets available for download from distributed edge locations that are closer to your end users, and that provide higher-speed connections than is generally possible with S3 alone.
If you have signed up for a CloudFront account — in addition to your S3 account — Cockpit will detect this and will enable its CloudFront Distribution management dialog. Start the distribution management tool by selecting the menu item Tools -> Manage CloudFront Distributions.... If this menu item is disabled, check that you are logged in to an S3 account that is also signed up for the CloudFront service.
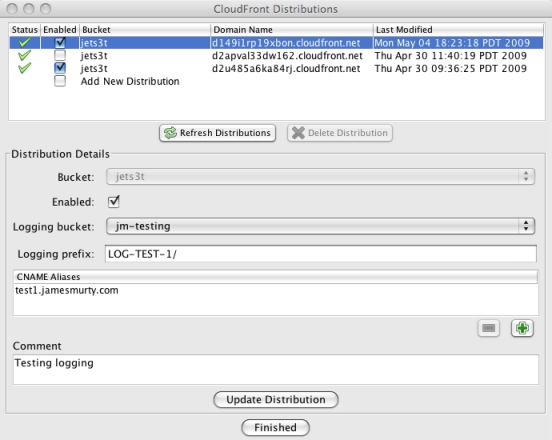
To create a new CloudFront distribution, first select the New Distribution item in the distributions table at the top of the dialog box. You then choose values for the mandatory fields necessary to create a distribution. Use the Bucket selector to choose which of your S3 buckets will be the source for the distribution, and indicate whether the new distribution should be Enabled as soon as it is created.
In addition to the mandatory fields you can apply optional settings for your distribution. You can enable Access Logs for your distribution by designating a Logging bucket into which log files will be written, and set a Logging prefix path for the log files if you wish. You can also specify any CNAME Aliases that will be routed to your distribution, add Comments to describe the distribution, and set the distribution to serve content only via secure HTTPS connections.
Click the New Distribution button to create the distribution.
To update an existing Distribution select it in the distributions table, adjust the Enabled, Logging bucket, Logging prefix, CNAME Aliases and Comment settings as you wish, and click the Update Distribution button to apply your changes. Due to the way CloudFront works, you cannot change the source S3 bucket for a distribution after it has been created.
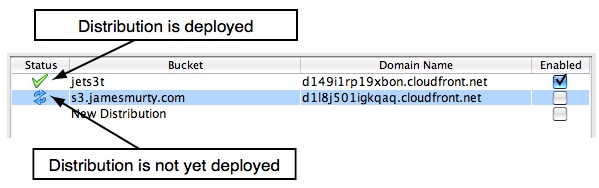
When you create or update a distribution, it can take some time for the changes to be deployed through the CloudFront service. You should expect to wait up to several minutes for a new or updated distribution to be completely deployed. You cannot update or delete a distribution until it has been deployed.
While a distribution is being deployed by the CloudFront service, it will have an icon next to it in the distributions table showing blue circling arrows. When a distribution is fully deployed, the icon will show a green tick. To check the current status of your distributions, click the Refresh Distributions button.
To delete a distribution select it in the distributions table, click the Delete Distribution button, and answer Yes at the confirmation dialog. Note that you cannot delete a distribution that is Enabled, nor can you delete a distribution that has not yet been fully deployed. Therefore to delete a distribution you may first need to update it to set the Enabled status to false, then press the Refresh Distributions button at intervals while you are waiting for the change to be deployed.
When you have finished viewing, creating or updating distributions, click the Finished button to close the dialog box.
Buckets With CloudFront Distributions
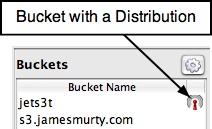
If you have signed up for a CloudFront account, Cockpit will display a second column in the buckets table to show you at a glance which of your S3 buckets have CloudFront distributions associated with them. Buckets that are the source for a distribution are shown with a radio antenna icon, while buckets that are not associated with a distribution have no icon next to them. The icon does not indicate the status of the distributions, such as whether they are enabled or deployed, merely the fact that you have at least one CloudFront Distribution associated with that bucket.
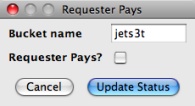
Configure a Bucket to be Requester Pays (S3 only)
Your S3 buckets can be configured to be Requester Pays, which means that the person who accesses objects in the bucket must have their own S3 account, and will be liable for the request and bandwidth fees incurred by their use of your objects.
To activate the Requester Pays mode, select a bucket and choose the Update bucket's Requester Pays status... item in the bucket action menu. Cockpit will display a dialog box with a Requester Pays? checkbox that will be ticked if the bucket is already set to be Requester Pays, and will be unticked if not. To change the status, simply tick or untick this checkbox and click the Update Status button to apply the change.